Lesson 2 Step By Step Photo Manipulation Tutorial 2021 | Photo Manipualtion
hello friends Once again I have brought for you very easy Photo Manipulation Step by Step, I have explained every step through image to teach you. Also, I have given links to the images I have used so that you can easily.
Link Image -
Model - https://www.deviantart.com/liancary-art/art/Epic-Red-Dress-Stock-3-868989258
Background - https://www.deviantart.com/pajunen/art/Twilight-487193073
Background 2 - https://www.deviantart.com/fairiegoodmother/art/Premade-BK-Stock-271-149154943
So let's start today's lesson I have shared every step with a photo, you will not find an easy way by following every step.
Step 2 - Now we will unlock this image first, for this you will click twice on the lock placed next to the layer, then a window will open, in that you have to do OK and the layer will be unlocked.
Step 3 - We will select the background sky with the Direct Selection Tool and delete it with the help of Del key, then press CTRL + D to remove the selection.
Step 4- Place the background image at the bottom of the Layers panel and do CTRL + D, hold down a corner to scale, then press Enter, then set the Adjustments within Image in the File Menu, then Brightness / contrast.
Step 5- Now we will select this girl photo with direct selection tool,
TOP 1 Photo Manipulation Effect 2021
STEP 6 - Now you run the Sharpen tool on this model, so that this image will start appearing in a little detail like the image given below.
Step 7 - Now we will take a new layer which is visible at the top of the layer panel by the name of Layer 2. You will know from this image how to take a new layer, then click on the color box in the left side and take blue color.
And then press OK, then press Alt + Enter to fill this color, by doing this this color will come on your page. And now you will add layer mask.
To do this, you have to add layer mask from below by pressing CTRL in the check box of the girl image layer, do not already add layer mask, first select the image then add layer mask. Then take the brush and run it in the clothes of the face and side of the girl image which is still selected, then when it is done, remove the selection of the image by pressing CTRL + D and now its mode which is still normal Overlay it .
Step 8 - Now you have to add color balance from the bottom like I have taken the layer. Like the image below.
Step 9 - A new layer has to be taken again, remember you should do the same way as I have set the layer. Now take the black color in the left side of the color box and then with the help of a brush, run it all over the edge of your page, not only the edge in the middle. Now if your color is getting dark black then Opacity is coming in the top right side of the layer, reduce it
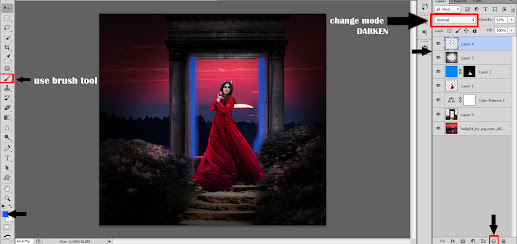
Step 10 - Now you will change the mode above the layer on which you have just colored the edge black, darken it from normal and also reduce the Opacity.
Step 11 -Then take a new layer and run the brush on both sides from the side blue color inside this pillar and then change the mode to normal, to change the mode, you will see a box above the layer panel in which normal is written, you will select the mode from it and It will also reduce its Opacity.
Now we have to change its mode also, you always take the one which matches with your background. And now we will reduce its Opacity a little Our last task is this from the bottom from where we took the color balance a while back, by clicking on Brightness / Contrast, we will enlarge it according to our convenience so that some lighting comes in this image. So friends, one last thing we have to do is the background image in which there is sky, we have to run a little Dodge tool in the back part of the wooden head so that some lighting comes behind that girl.
Also Learn -
How To Use Clipping Mask In PhOTOSHOP
PHOTOSHOP INTERVIEW IMPORTANT QUESTION ANSWER
5 Best Photoshop Tool
Photo Manipulation Easy
Photoshop tutorial - Head Photo Manipulation
How To Change Dress Color In Photoshop
Dramatic Photo Manipulation In Photoshop
Friends, this was a simple TOP 1 Photo Manipualtion Effect, if you liked it, then do share the share post on your social account, we will see you soon with a new post. *****************GOOD BYE *****************


If You Have Any Problem Please Let Me Know.